

")
")


Today I’m sharing a Photoshop tutorial that I think all bloggers should be familiar with. In this clipping mask tutorial, you’ll learn how to create custom photo layouts as well as some pretty cool typography. Both of these things can be useful in creating blog posts and designs that look professional, cohesive, and unique. This tutorial is as easy as they come, so I think you’ll enjoy it! If you don’t have Photoshop, you can download a free trial on their website, which actually allows you to try out ALL Adobe software. Pretty sweet!
Since I’m covering two ways that you can use clipping masks today (photo layouts and typography), this tutorial will be divided into two parts. Now, let’s get crack-a-lackin’.
Tutorial One: Using Clipping Masks for Typography
Step One: Create a new document in Photoshop. If your document is going to be used on the web, I recommend setting the resolution to “72.” Next, type out your word(s). I chose “HELLO” to keep things simple, but you could also use this tutorial for blog headers, as text to lay on top of photos in posts, etc!

Step Two: Create a new layer ON TOP OF your text layer. You can create a new layer either by going to Layer >> New >> Layer (in the top menu) OR by clicking the thing that looks like a piece of paper next to the trash can in the bottom right of your layers panel. Your new layer will be blank (white). Then, you can draw whatever you want in that new layer. I chose to draw some colorful scribbles using the brush tool.

Step Three: Make sure your new layer is highlighted in the layers panel (like mine is). Then, go to Layer >> Create Clipping Mask. A shortcut is to hover between your two layers (in the layers panel) with your cursor while holding down the option key (on a Mac). You’ll see a little arrow pop up and when you click, it will create a clipping mask.

Step Four: Admire your badass work.
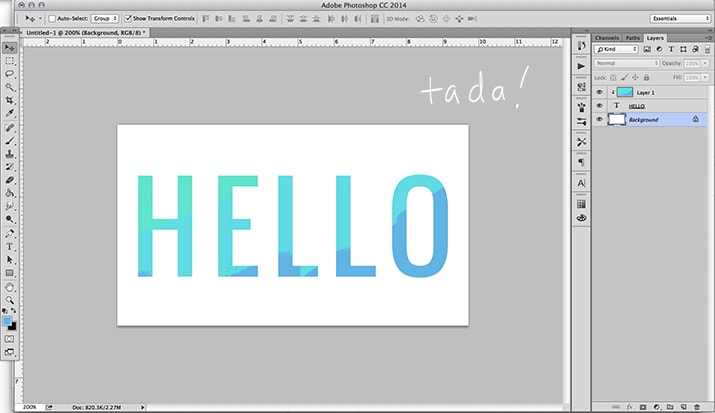
Alternatively, instead of creating a new layer in step two, you could drag a photo or another graphic on top of your text (just make sure it’s on top of your text in the layers panel). In the example below, I dragged a shiny gold image into my document. Then, when you create a clipping mask, your words will take on the effect of the image you’re using, which makes my words look gold!

Tutorial Two: Using Clipping Masks for Custom Photo Layouts
In this tutorial, you’ll learn how to make a custom photo layout. I’ll show you how to make a grid with four square images, but you can easily use this tutorial to create round images, grids with more images, etc.
Step One: Use the rectangle tool (in your toolbar on the left) to create a square. It doesn’t matter what color it is.

Step Two: Create three more squares. An easy way to do this? Right-click your first rectangle layer and then click “Duplicate Layer.” This will create an exact copy of your square, which you can then drag next to your original square. Then, you can highlight the first two (in the layers panel on the right) and click “Duplicate Layer” again and drag those two new copies to the bottom, so that you now have four squares of equal proportion and in the same alignment.

Step Three: Drag a photo or image into your document. This photo will take on the shape of the square that it sits ABOVE in the layers panel. The image below is important, because you’ll notice that my image is above the top left square in my layers panel AND it’s on top of that square in the actual document.
Then, same as the first tutorial, go to Layer >> Create Clipping Mask. You must select the TOP layer (i.e. the photo you want to trim) when creating the clipping mask. A shortcut, as mentioned above, is to hover between your two layers (in the layers panel) with your cursor while holding down the option key (on a Mac). You’ll see a little arrow pop up and when you click, it will create a clipping mask. The image should then be cut to take on the dimensions of the square. Want to move your image? Just drag the photo layer around until you get it into a position you like.

Step Four: Do the same thing to all of your other squares until you’ve created your layout. I often create layouts like this and then save them as templates on my computer, so that I can reuse them for future blog posts. You can see an example of a blog post I recently did where I used a clipping mask to easily create 20 photo layouts.

Make sense? I sure hope so! Let me know if you have any questions below. 🙂 If you end up making something with this tutorial, I’d LOVE to see it! And if you found this helpful, I’d kind of love you if you pinned it. 🙂
p.s. How to Create a Hand-Lettered Blog Header (No Scanner Needed!)


")


I just did this for the picture on my post today! 🙂
Um, and it looks AWESOME! Love those Autumn vibes!
Thank You 🙂
LOVE this. Thank you for sharing!! I’ve been wanting to learn how to do even a few basic things in photoshop for a long time. You’re the best!
Also, for people without photoshop, pixlr.com seems like a really similar (free!!) program, though I haven’t done much with it yet.
WOO! Glad to help, Simone! I’ve heard of Pixlr, but haven’t dabbled in it. I bet it’s awesome!
This is really helpful, going to use this in my future posts 🙂
http://apotofvintageplease.blogspot.co.uk/
Lucy xx
WOO! Glad it’s helpful, Lucy 🙂
Melyssa, this is an awesome tutorial, thank you so much! Can’t wait for more of these in the future! I would love to see a tutorial on how you take your art (drawings, calligraphy, etc) from sketch to the digital world! Like what kind of scanner you use, etc…
So glad to help, Amber! And funny you should ask, because that was next on my tutorial list! And you don’t even need a scanner. :DDD
My blog header is made using a clipping mask! This would have been an awesome tutorial to have when I was figuring out how to do that but I used a not-so-great you tube video instead which did the trick. Looking forward to more of your pS tutorials! 🙂
So cool, Anna! That header is so expressive of what your blog is about — love that! And Headway users unite! hehe 🙂
i’m alwasy looking for great new tips for blogging! Thanks! 🙂
Glad to help, Alycia! 🙂
fun stuff – love these kinds of posts!
Thank you Sara! 🙂
I’m so glad I read this… I never knew what it was called when you did that with the letters, but I love the way it looks and i have a lot of ideas for doing that… so thank you! You should definitely make more Photoshop tutorials. 🙂
Agreed! I’m a complete newb 🙂
Glad it sparked some ideas, Zoe! And sometimes I feel like that’s the hardest part of designing…just figuring out WHAT to search in Google to figure out how to do something haha.
This is so useful! I’m getting better at InDesign and Photoshop all the time, and this is exactly something I could use.
Woohooo! Glad you liked this, Adia! 🙂
Ah! This is so useful. I’ve been using Photoshop for awhile but had no idea how to do this. Thank you for sharing! I will be trying this out soon! You rock!!
So glad you liked this, Michelle! Have an awesome evening. 🙂
I actually just have Illustrator CC but you inspired me to figure out how to do it on there! I’m tinkering around with my blog and I used the clipping mask in my new header. Still tweaking, but I think I’ll be using this trick often. Thank you!
That’s awesome to hear! It’s definitely possible in Illustrator, too and your new header is looking COOL! Great clipping mask usage. 🙂
Thank you so much for this! I’m new to the world of blogging and this is going to help me out so much. So glad I stumbled upon your blog today!
Woohooooo! Glad you liked this, Larissa! And I’M so glad you stumbled upon my blog, too! Thanks for stopping by 🙂
This is so amazing! Thank you for this! Will definitely be using this technique for my blog!
Woohooo! Awesome to hear, Hazel. 🙂
I love this technique! Never knew about it since i just started using photoshop.
Thanks for sharing <3
X
Carina
Running White Horses
Glad to help, Carina! 🙂
You make photoshop look incredibly easy. I haven’t taken the plunge to purchase it yet because it intimidates me. However, I’m sure if I just jumped on board it would be great. I currently use Lightroom for all picture editing and then I use free software on-line. I feel limited by free on-line sites so I think one of these days I’m going to have to purchase Lightroom and take a class.
I’ll for sure pin this because 1. It’s great and 2. I’ll use it once I purchase Lightroom.
How long did it take you to learn blog design? That might be a hard question to answer. It seems so hard to do but yet so many people are designing.
You’re so sweet, Beka! I think if you spend some time messing around with Photoshop’s functions, it’s not too difficult to learn. That’s awesome that you’re looking to upgrade your software, too! A true mark of learning. 🙂
And hmmm Photoshop has been a hobby of mine for many years, but my knowledge was veeerrrryy basic during most of those years. I think I got serious about Photoshop around the time I got serious about blogging (about 1-1.5 years ago) and have been doing blog designs for about a year. If you’re interested in trying that, you should! You can do some free or cheap designs first, to get into the groove, and then raise your prices as you become more skilled/experienced. 🙂
Wow – thank you so much for sharing!
Anytime, Camila! 🙂
Great tutorial. I published a similar tutorial to this but on glitter only. I absolutely love the brush effect you came up with!
Thank you Jennifer! I bet glitter would look so awesome! 🙂
Thanks you Melyssa for sharing this! I learned about clipping masks a long time ago, however last time I went to go do it, it had it all backwards and couldn’t get it to work! This tutorial was much more simplified than the way I learned it before…so I believe that it will be much more helpful!
http://www.daughterziondesigns.com
I’m really glad to hear that, Reva! Especially because I was wondering the whole time writing this if it was coming out super confusingly haha. 🙂
This is SOOO AWESOME Melyssa! I’ve been itching to know more about photoshop so this is so perfect. I’ve also always been interested in the way you designed your e-book that comes free when you subscribe. I love, love the layout and the design. Is there a specific program you use for that? I suppose that could be another tutorial for another time, but that’s something that’s always piqued my interest! I’m such the writer but the design part always stumps me 🙂 Fantastic post!
So glad you like this, Monique!! And I used Adobe inDesign to design that e-book. As a writer, I think you’d love that program! It makes creating layouts (for magazines, PDFs, e-books, etc) pretty simple.
Amazing tutorial, I love the first example with the text, it lools so tumblr 😉 thank you
haha thank you Bell! 🙂
Awesome tutorial 🙂 You make it so simple!
I’m SO glad to hear that, Kayse! I kept wondering if I was making it sound SUPER confusing haha
This is super helpful! I’ve been working on upping my Photoshop game recently, so will definitely be returning to these tips again and again. Thanks so much!!
Awesome, Stacia! Hopefully I’ll have more tips in the future. 🙂
wow this seems so easy I would of done it the long way of highlighting the outside of the text and deleting it on the top layer x) your method is more efficient, which I love! I’ll be for sure using this. Thank you for sharing 🙂 How about a post about typography? I’ve always struggle on what font to use and I’m uncertain about how some of them looks or where would be a good place to get some fonts.
I totaaaaally did that same thing of highlighting the outside text before discovering this tool. I like this method because deleting the outside of the text doesn’t allow you to reposition the pattern on top of the text, but this way does! 😀 Hopefully that makes sense. 🙂 And I’ll definitely keep a typography post in mind for the future! Thanks for the suggestion. 🙂
I already knew how to do this, but I never thought to use it when making collages! This is going to save me so much time in the future.
Awesome to hear, Toyosi! 🙂
Awesome, just what I needed thank you!!
Anytime!! 🙂
this is incredibly helpful, thank you so much for posting!
You bet, Kari! 🙂
This is so useful! Love how simple it is, too. Thanks!!
Glad to help, Anna! 🙂
This is awesome! Thanks so much for sharing!
You’re so welcome! 🙂
Really helpful!!
http://myprettymessblog.blogspot.pt
Glad to hear that, Joana! 🙂
Have always wanted learn how to do this! Very helpful, thanks!
So glad to help, Victoria! 🙂
This just blew my mind. Thank you.
WOO! I’m going to have to cross “blow someone’s mind” off my to-do list today. 😉
Haha, what an awesome everyday to-do.
I’m totally adding that to my bucket list!
I may have commented before – but I had to tell you that I just came back and used the tutorial to help me create a format for my gift guides! Thank you – and I guess this means I should probably purchase Photoshop since now I am able to say that I actually created something that I can use over and over again in it. (FINALLY!)
YAY! Kimberly, that is such awesome news! Don’t you love when you conquer something you didn’t realize you could do? And if you don’t want to be Photoshop outright, you can pay $10/month to use it on their Creative Cloud. Same software, but you don’t have to spend so much up front and you always have the latest version. 🙂
I’ve been back and forth on their website all weekend thinking about it! They have a BF sale – so I may just spring and get it on the cloud. I feel like I need to bite the big one and leave PicMonkey for good – It’s time to be a Big Girl Blogger. lol
You won’t regret it!! 🙂
I recommend you here in this link. You can find many information about Photoshop. It may helps you so much. http://www.clippingpathspecialist.com/blog/
Interesting! Seems like I can’t run a blog without learning clipping path photoshop works. Otherwise, need to hire someone else to do that.
It’s a beautiful presentation about the Clipping mask. The pictures are much the better. Looks like living photos. This post is very good. Thank you for presenting a very good post.
I knew both tutorials, I even use them one in a while. But never thought of that brusheffect or for the grid. Now I just need to do this myself!
This was SO helpful, thank you! I just did my first photoshop clipping mask venture and I think it was a success. (it’s the most recent post on my blog if you want to check it out!)
stellasjournal.wordpress.com
WOO! So glad it was helpful for you, Stella. Your post looks great! 🙂
We all know why use photoshop. Yah by that many of designer like me done Clipping Path, Image Masking, Background / Object Removing, Image Shadowing, Retouching & Restoration, Jewelry Photo Retouching, Wedding Photo Retouching, Glamour Retouching, Logo Making, Magazine
Designing, Raster to Vector Conversion- http://phototrims.com/clipping-path-services.php
What’s even more fun (and addictive!) is playing with layering textures over that! LOVE the idea on doing the squares … I’m totally going to try that one! Never occurred to me to try that!
Yess love to layer textures, or anything really — so fun! And glad to help with the squares idea. 🙂 Can be very helpful for photo posts!
It’s might be simple but very very useful. Most of the people need to do this everyday. Thank you for sharing MELYSSA GRIFFIN.
We all know why use photoshop. Yah by that many of designer like me done
Clipping Path, Image Masking, Background / Object Removing, Image
Shadowing, Retouching & Restoration, Jewelry Photo Retouching,
Wedding Photo Retouching, Glamour Retouching, Logo Making, Magazine
Designing, Raster to Vector Conversion.
thank you for your tutorial.. its really very helpful
Awesome to hear that, Tanvir! 🙂
🙂
Create a Clipping Mask in Photoshop is very important. This article is very good and hope this tutorial will help bloggers and others.
Great tutorial !! Thanks a lot
http://bitly.com/1a9skce
Thank you for the
tutorial! As a person who understands only half of what she is doing with
Photoshop, I appreciate this.
http://www.colorexpertsbd.com
Expert Clipping is the best solution of image editing services so request a quote now if you have any images need editing. http://expertclipping.com
I’ve always wanted to learn how to do this! You’re the best! Thanks for this pin-worthy post.
Glad it helped, Christine!
I’ve also always wanted to know how to do this! Done and dusted. Thank you so much. Now I need to learn how to create a circle mask/overlay so I can get my photos to appear on my blog the way I want. Similar concept I think. I’ll let you know how I go 🙂
Which I’ve now done! Totally nailed it. Thanks so much 🙂
This is my amalgamation of the two tutorials… I love it!
Aw! You are too awesome. Love this!
I lust loved this simple and useful tutorial. Thank you Melissa!
Can you please do more tut posts like this in the near future? ^.^
Awesome! Glad to hear you enjoyed this. 🙂 I’d love to do more tutorials! Anything in particular you’d like to learn about?
Fabulously well done tutorial! Now in my “Pocket” so I can refer to it at anytime. Can you tell me what font you used for the ‘HELLO’?
Woohoo! I believe the font is “Oswald” 🙂
Your tutorial looks much easy to follow. You may also visit my work about Clipping mask.
http://www.clippingpathexperts.com/
Though it is your 1st tutorial, it is well organized. it is helpful for new learner.
Thank you very much!
Thank you so much, this is gold!
You are so welcome, Carrie. 🙂
Really nice and helpful photoshop tutorial and especially very helpful of beginner thanks for sharing and step by step details !!!
You bet! Thanks for stopping by Enamul.
I’m loving your PhotoShop tutorials. I do use PhotoShop, but in a very basic way. I know the program has immense more potentials than I use it for. Your tutorials are helping me discover those potentials.
Thanks so much!
Nice tutorial thank you very much for share it . Please visit our business site for image editing service : http://dinamicostudio.com/portfolio/
This is awesome – I love your tutorials! I know so little about Photoshop and feel overwhelmed by everything, and the way you chunk it out into digestible bits is seriously rad. Oh, the link at the end for the related blog post yields a 404 error…can you reply to this comment with a link (or fix it in the text)? I would love to see that post!
Hey Kristi, I’m so glad this was helpful! You’ll be a Photoshop pro in not time. Thanks for the heads up about that link! I’ve left it below for you and I’ll also fix it in the post!
https://melyssagriffin.com/create-hand-lettered-blog-header-without-scanner/
its really cool to learn Photoshop, specially for young dreamers like that really wants to know more about it. It makes you express your feelings, whether your in a good mood or bad. and its really cool using Photoshop. Now i learned after follow your tutorial step by step & bookmarked it as though come here & learn different one. For same categories visit here
Thanks for commenting and bookmarking this Danielle! >_<
I am very much pleased with the post. I want to thank you for this great article. I enjoyed every little bit part of it and I will be waiting for the new updates.
Thank you, Rahul!
Great tutorial on Clipping Mask Photoshop. Though I think myself to be quite expert in Adobe Photoshop, I have learned something new from the tutorial. Thanks for sharing it.
So glad this was helpful and provided something new! Thanks for commenting 🙂
🙂
I seen this tutorial attentively and i gather much knowledge about clipping mask. Hopefully i will try it successfully. Thanks for posting a nice tutorial.
You’ll be great! xoxo
Wonderful Photoshop tutorial for creating clipping mask. thanks
Thanks so much for the kind words, Soniya! Best of luck to you 🙂
HI Melyssa! love your clipping masking Photoshop tutorial. Your article is incredibly
beautiful. I love to try for this myself & bookmarking this page. Please visit us for getting image masking service:http://www.statbd.com/ImageMaskingService.asp
It is extremely helpful for me. Thank you for taking the time to discuss this. I feel strongly about it and love learning more on this topic. If possible, as you gain expertise, would you mind updating your blog with more information.
Yay! I’m so glad you found this post helpful! Thanks for the suggestion and as the blog grows, we may be able to cover more topics like these 🙂
Brilliant tutorial. Now i want to try it.
Give it a shot! Good luck, Ahmed 🙂
Melyssa! This post has been a revelation for me! Thank you! I’m new to blogging and photoshop and tried to make some text look metallic gold with the *most* complicated tutorial I found, it took forever and I would never have easily been able to recreate. Your post has given me hope that it’s not all as complex as I thought!
That’s great to hear, Abbie! I’m so glad this post was helpful for you and please do keep me posted on your progress! 🙂
Glorious! Very informative and helpful article for every Photoshop worker. Image clipping mask is an important part in Photoshop. Photo Masking is required when anyone want to separate a part of a photo from the whole image where the edges are not well defined or sharp. Lot of images are being use on online fashion area after clipping mask. I’ve also an offshore graphic design house https://www.clippingcrowd.com/ which offers Photoshop clipping path service and photo clipping mask. Thanks a million for submitting the post. And waiting for next article
Photo Masking is required when you want to separate a part of a photo from the whole image where the edges are not well defined or sharp. It may be the whole image or a simple portion of the image. With this process, you may change or alter the background of an image with blurry or thin hair like edges or transparent glass edges and make clear to show every detail.Bring any low-quality image to http://www.clippingcrowd.com we will make a decent picture out of it. Our specialties include making models more attractive by removing wrinkles from the skin, add make-up, removing spots or defects from your picture, remove red eyes and even work on your smile to give you that perfect toothpaste model smile.
Very good afford, and a smart tutorial. Thanks Malyssa
Thanks for the kind words, Abdullah. 🙂
Really this tutorial is more details step by step, so that it is easier to learn for any one who want to create something
new in any picture by photoshop. Thanks for sharing.
Wow!! many many thanks for publish a good layer mask tutorial……i need it…..
Woohoo! So glad this was helpful for you. 🙂
yes it’s so helpful tutorial
Thanks Malyssa for this detailed tutorial. It will be helpful for the newbies to learn better about masking.
No problem! Best of luck to you and please keep me posted on your progress. 🙂
As a Graphic Designer, I have found the resource for free and also most important those who design web, apps.
Really good thing that you have shared. Thanks
Great post thanks for sharing, it is very important to improve the security of online store.
Your article is very attractive to me.
Your post was published 2 years ago but i thing these tips are evergreen.
Thanks, Nasrin! I’m so glad you found this post helpful. 🙂
Cheers Melyssa. Worked like a charm.
Awesome to hear! Keep up the great work, Shane. 😀
Thanks Malyssa,this is very beautiful article, I am Totally new in graphic line..
U can teach very beautifully…..
Thanks so much for the nice words! Best of luck to you. 🙂
Hay,
How coud I say only marvelous? You deserv more than that.
It helps me a great deal your post.
Keep posting regularly. BTW I got your post from googel search engine.
Thanks so much for the kind words! 🙂
I think today it is not a tough task to find the best photo editing services. We have such services like Photoshop, Photoscape, etc… for better photo editing experience. There are also online photo editing websites for ensuring better beautifying methods on photographs. I would like to mention about such a photo editing website which gave me the best experience (http://www.photoeditingindia.com). If you want to feel the difference you can try out this website at free of cost.
Dear Melyssa Griffin, I am late to come on your blog but today which I have learned really that is difference & looking totally new to me. I have added this skilled & hope while I will deliver Photoshop related service i will keep on mind your creative technique. Thanks for your excellent post.
So glad to hear this! Please keep me posted on your progress. 🙂
eye catch work of layer mask . really nice job. thanks for sharing us
great job!! this article on
clipping mask
was simple and easy to understand
Your clipping masking technique is very benefited for graphic designer?
Thank you for the feedback, Ab! 🙂
amazing tutorial i am new in graphic but i nicely understand what can you done please keep up regularly ..Thanks lot
So happy to hear that, Shakil! 🙂
thanks
I am really happy to visit your post. I love designing too much. I got more information form your post. Thanks for shearing.
So glad to hear that, Sofiq! Thank you for your comment 🙂
Thanks great typography tutorial. I found your tutorial through by google.
So freakin’ awesome to hear that, Yusuf. 🙂
Hi ,Melyssa you have covered an extreme informative article about photoshop masking service. Great job.
Thank you for checking it out! 🙂
Great post as usual. To learn about clipping mask this post would be the great resource.
Thank you so much for reading, Rex. 🙂
This is a really helpful tutorial, Melyssa!
It’s a frequent need I have too as a marketer. I just launched a free clipping mask tool (started as a side project for myself), because I don’t have paid tools like Photoshop. Hope this can help anyone who’s in the same situation: https://www.goodmarketing.club/tools/create-clipping-mask