


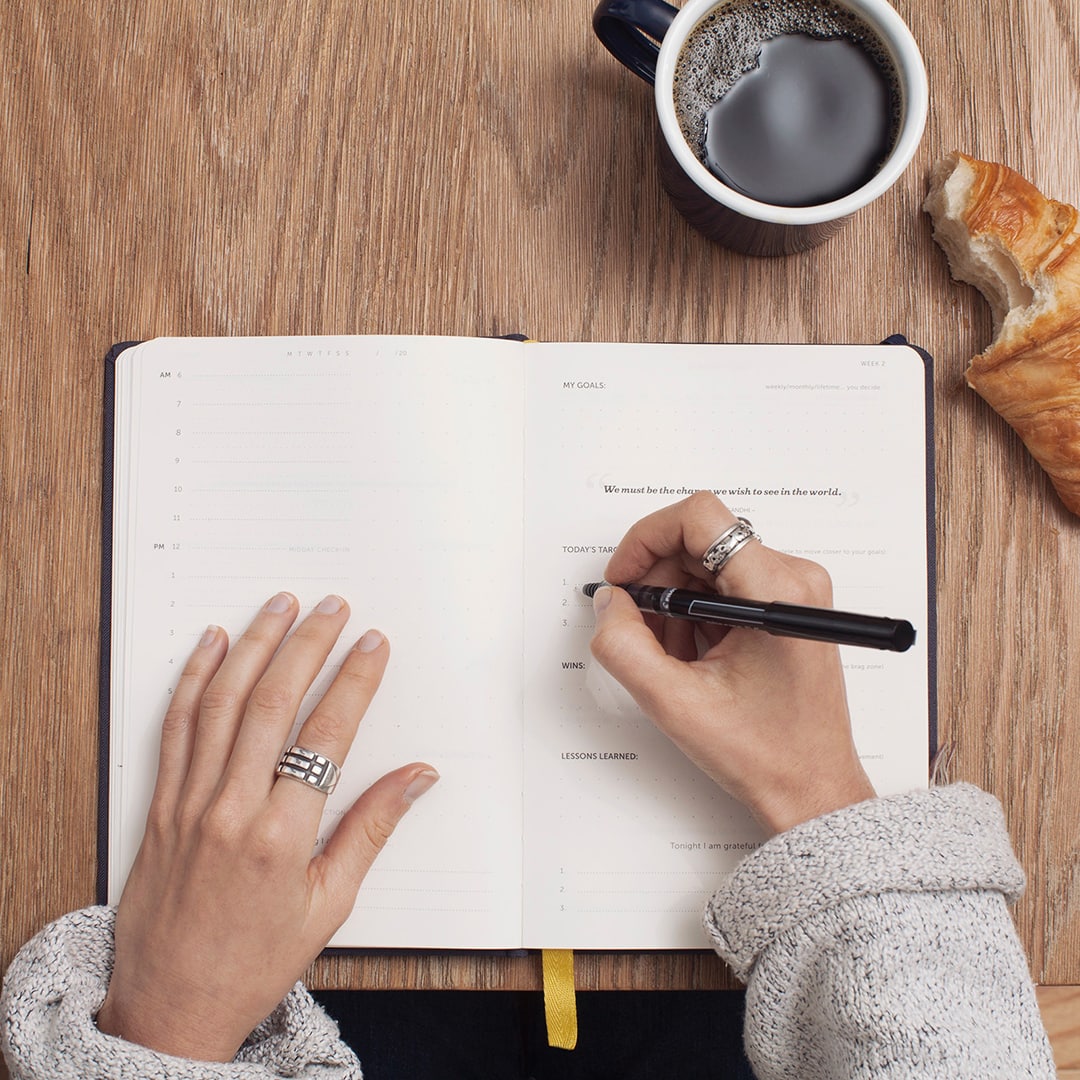
")
")

I’ve talked before about the impact that Pinterest can have on your blog or business. Simply put, it’s an incredible marketing platform that has the potential to grow your site’s traffic, email list, and audience…on autopilot.
I also told you that Pinterest is more akin to Google than it is to any social media platform. That’s because Pinterest is a search engine above all else.

But what sets Pinterest far apart from its nerdy Google counterpart? (Don’t worry, I still love you, Google).
It’s visual.
Which means that if you’re not creating beautiful (AND strategic) graphics, then it will absolutely dull your performance on Pinterest.
So, what goes into a high-converting blog post image? One that will get thousands of repins, heaps of traffic to your site, and the potential to grow your email list or go viral? It’s not just good photography or pretty fonts.
In fact, there are seven specific things you should add to all of your Pinterest images, which we’ll cover in depth today!
I’ve also got plenty of before and after examples so that you can see the actual results that better graphics can have for you, too.
Let’s dive in, yes?
First, let me share a little comparison of my own blog post images through the ages. This will give you a good idea of where I went wrong and what you can change, too.

The image on the left was created in my first year of blogging (when I clearly thought I knew everything about blogging after a handful of months in the game — ha!). I love that this image has a large, clear title. You immediately have an idea of what the post is about and the title makes it easy to read.
But that’s where the compliments end. *gasp*
Although the image on the right is for a different blog post, it’s got a whole lot goin’ for it.
Unlike the image on the left, my new image template is vertical (which makes it more visible in Pinterest’s feed), has a larger title that is hyper-specific, references a freebie you’d get by clicking through, includes a link to my website, and is just more well-designed overall.
One afternoon, I went through most of my old blog images and updated them with new, on-brand, Pinterest-ready graphics. I then pinned those new graphics onto Pinterest.
Almost immediately, I saw a jump in my traffic. My new images (like the one you see on the right above) were taking off. In three months, my once-stagnant traffic had grown by 100,000 pageviews. And part of that is certainly due to the new images I’d created as part of my Pinterest strategy.
Today, I want to help you pinpoint what you could change about your own images in order to get the BEST results on Pinterest and the web as a whole.
Here are seven things all of your images should include:
1. Large, easy-to-read text
When people are scrolling through their Pinterest feed, they’re not taking time to read every single description. They want to know exactly what they’ll get out of your blog post at first glance.
By adding a large title on your image, you’re showing people the value that you’re giving away in your post, and enticing them to click through or repin it.
Here’s a before and after example from one of my Pinfinite Growth students, Emma Rose, who is a graphic designer and photographer.

Although I love her sweet little face in the “before” picture, the title is very difficult to read. This type of image may work inside of a blog post, but will not get many repins or click-throughs on Pinterest, simply because people don’t know what they’d be getting out of the post at first glance.
But that “after” image? What a stunner! The image itself is captivating and draws you in, while the text stands out more and lets you know what you will get out of her blog post if you choose to read it.
I also love that the image is vertical, as this will stand out much more in Pinterest’s feed.
Four months after using my Pinterest strategies and updating her blog post images, Emma Rose grew from 50 followers to over 1,300. And her pageviews have more than doubled. Huzzah!
But what if you blog about something that doesn’t lend itself to adding text on top of your image?
For example, fashion, art, or hobby photography. In that case, focus on the takeaway that someone will get out of your post. Is it “20 Photos of Belize That Will Inspire You to Travel”? Or perhaps “How to Wear Plaid for Fall”?
Even if you’re in an artistic niche, you’re still providing some sort of value to your audience. Use that value to write a headline for your blog post and then add it to your graphic.
And of course, you only need to add text to one image in your post. You can add plenty more images of your beautiful artwork, style, and photography — just make sure to have at least one that you can utilize on Pinterest.
2. Vertical vs. Horizontal
As you can see from the first two examples above, vertical images just appear larger in the Pinterest feed. This is because all images are the same width, so horizontal images will naturally have a smaller height than vertical images.
I recommend adding images that are 800 x 1200 pixels. For reference, that’s the size of the image I used for this blog post at the very top.
If you only take TWO tips from this entire post, make it #1 and #2. Having vertical images with text on top is critical to getting more traffic to your website from Pinterest.
Here’s an example from one of my Pinfinite Growth students, Jessica, who recently created a vertical image template for her blog posts. Before, she was just adding the horizontal images into her posts with no text. Now, she has a vertical image with a clear title right on top.
And notice how Jessica combined two horizontal images to create a vertical image. Genius!

3. On-brand colors and fonts
I was the WORST at staying “on-brand” when I started my blog. Blogging, for me, began as a creative outlet, so I wanted to try ALL THE THINGS. Every month, my blog had a new design. And almost everyday, I experimented with new fonts and graphics.
Experimentation is great in the beginning when you’re trying to find your style and groove, but after awhile, it’s important to really hone in on your brand’s identity. In order to do that, I recommend creating a style guide for your brand.
A style guide allows you to pinpoint your brand’s personality, fonts, colors, and more, to ensure that you stay consistent.
Because here’s the deal on Pinterest: there are over 100 MILLION users (which means there are a LOT of pins to compete with). If your pins are sporadic and inconsistent, then the peeps on Pinterest are not going to recognize you.
But if all of your images followed the same theme, template, colors, and fonts? Then it’s a lot more likely that Pinterest users will eventually “recognize” your brand on Pinterest.
They’ll think, “hey, I feel like I’ve seen an image like this before!” It adds an almost omnipresent effect to your brand, where someone subconsciously deems it as “better” because you appear to be everywhere at once.
Eventually, they’ll be more inclined to click through to your website, either out of admiration or curiosity, and then you have the chance to convert them into a subscriber or customer. #boom.
4. Your website link
The very nature of Pinterest is that people are taking an image from your website and then putting it somewhere else on the internet (their Pinterest boards). Generally, that pin is designed to link back to your website to keep everything connected. But what if there’s a glitch? Or if someone removes the link? Or — gasp — uses your pin for their own blog post? Then you’re out of luck, my friend!
This is one reason why adding a link to your pin is important. But it’s also useful because it works similarly to #3 — people begin to know your brand name and website link. When we see something over and over again, eventually it feels familiar.
Keep this in mind: humans are designed to care more about what’s in it for them (especially people who have never been to your website!). So, if they’ve never heard of your website name, then adding a huge link on your pin doesn’t add any value for your potential visitors — it doesn’t answer the “what’s in it for me?” question.
Instead, add a large title to your pin (which tells your viewers what the takeaway is for them) and keep your website link relatively small.
5. Keywords in the file name
I’m not sure that this one will help on Pinterest (though, it’s possible!), but it can certainly help drive more traffic from Google, so I wanted to include it.
This tip is simple: instead of naming your blog post images something like “275_45.JPG,” you should include keywords in the image name itself. Keywords are words or a phrase that someone may be searching for (on Google or Pinterest) in order to find your blog post or graphic.
For example, all of the images in this blog post are some variation of “pinterest-graphics.JPG.” That way, if someone searches for “pinterest graphics,” then it’s possible this blog post will come up in their search results, simply because I named my images something relevant to the takeaway of this post.
6. Reference to an opt-in incentive (if applicable)
This is one of my favorite tips! Since early 2015, I’ve used Pinterest strategically in order to drive more traffic to my website. At the beginning of 2015, my email list was very stagnant. It initially grew to about 2,000 subscribers when I first advertised my new email list to my audience (it grew to 2,000 because that’s about how many people were in my audience at the time).
But after it grew? It remained stagnant for over six months — I was barely getting any new subscribers because I wasn’t attracting new people to my blog.
Then, all of a sudden, after implementing my Pinterest system, my number of subscribers quadrupled to 8,000 people in 6 months, and was growing exponentially.
Now, I get between 8,000-10,000 new subscribers every single month, which is largely due to the new people Pinterest drives to my blog on a daily basis. It still amazes me.
So, you’ve heard the results this can bring you…now what does this mean for your images?
It means that if you have some sort of incentive for people to join your list (a free worksheet, email course, PDF download, etc), then you should put it right on top of your Pinterest image so that it’s immediately evident that someone will be able to get a valuable freebie if they click through to your post.
Here’s an example of a few of my own images that use this strategy:

You can see that right on top of the image, I let people know what kind of freebie they’ll get. If someone is already interested in the topic (especially while scrolling through their Pinterest feed), this can be the tipping point that gets them to click-through. Then, they’re likely to subscribe.
7. Evergreen content
Aaaaand last but not least, Pinterest is not the place for time-sensitive information, like one-time events or webinars. Pinterest looks for evergreen content, which is content that is timelessly valuable.
Sometimes, you’ll find that a year later, one of your old pins is going viral. This is part of the beauty of Pinterest — like Google, old content can quickly become popular.
But if your content isn’t evergreen, then it doesn’t stand a chance. #realtalk.
Here’s an example from my Pinfinite Growth student, Paola, whose “before” image is pretty and well-designed, but its square size and time-specific content isn’t right for Pinterest.
Her “after” example is stellar though, isn’t it? The text is easy-to-read and the image itself offers a very clear takeaway to people scrolling through their feed.

Paola told me that just two weeks after updating her Pinterest images, her daily viewers from Pinterest quadrupled and her pageviews increased by 10x, from 50 daily pageviews to 500 daily pageviews. Whoa!
If you put all of these tips together, you’ll be well on your way to creating Pinterest images that convert users into new traffic, subscribers, and engagement.
Got a question? Something to add? Let’s chat in the comments section down below! (I respond to every single comment). 🙂


")


Hi Melyssa! Thank you for including me in your post today! It has been 2 weeks since the start of your Pinfinite Growth course and I am continuing to utilize the tips I’ve learned to improve my Pinterest account and my brand/blog in general. I can’t wait to update you in the coming months about my improvements and hopefully success 🙂
Thanks for letting me share your awesome graphics, Jessica! I can’t wait to hear more about all of the progress you’re making 😀
Awesome post! It was so helpful!
LIVING IN PLAID – Personal Style Blog from Brussels
Yay! I’m so glad you liked it, Sofia 🙂
Hi Melyssa,
Another great post. I must say that I’m completely fascinated by Pinterest Image science. I’m not sure that is a thing, but that’s what I’m calling it. Before I started to dive into Pinterest and tried to see what others were advising about creating awesome Pinterest images.
What I was curious about was what colors perform best? Because I’m in the same niche as you I would look at group boards where my pin would be competing. The goal was to look the complete opposite of everyone else so they all stand out.
So all of my images contain a background image overlaid with a solid color gradient. Some use two colors for the overlay, but the majority have been black, green, red, and blue.
It seems like red has been performing the best which I think Pinterest themselves said was true a couple years back.
But as you mentioned you want to stay on brand as much as possible so for you red might not make sense.
I love browsing my Pinterest feed and knowing whose pins I should click because I recognize the brand. I know a Griffin pin from a mile away now!
One of the most important things that you didn’t touch upon here, but you do very well is nailing down your copy. If the text on your pin doesn’t pull people in then it doesn’t matter how pretty you make that pin so make sure you keep on working on your headline writing skills, everyone!
What makes Pinterest awesome is that you can pin multiple images for a post with different headlines to see which ones are performing the best. After two months I have a general idea of what type of headlines make my audience click and which ones they completely ignore.
You’re absolutely right about the copy on the graphic being crucial to the CTR of a pin – thanks for pointing that out! Your comments are always so detailed and helpful – almost like a mini blog post. I appreciate you, Scrivs! 🙂
Great post Melyssa,
I like your point about staying on-brand – actually, that’s how I originally found your blog … I started recognising your pins, and was curious enough to click through to your site! I’m glad I did 🙂
On that note, I’ve noticed not all your pins are the same – they’re all on-brand, but there are a few different styles. I was wondering if that’s part of a strategy? (e.g. is having visual variety a good thing on Pinterest, even though the pins should still be recognisably yours?)
Thanks for the tips, I’m off to pin this post now!
Hey Melyssa,
Awesome post! I never realized until recently how great Pinterest is to help grow your blog, followers, income and list!
I
recently started incentivizing my pins and it’s totally helping me grow
my blog and list. Love it! I also agree that Pinterest is much like a
search engine. More and more people are bypassing Google and heading
straight for Pinterest when it comes to searching up products and ideas.
Thanks for sharing your knowledge bomb!
Elna at TwinsMommy.com
That’s so great to hear, Elna! Best of luck with everything and please keep me posted on your progress 🙂
风吹过,我来过!
Great post Mel,
I have big problems with hitting that spot for designing good graphics for my blog posts as I’m not much of a designer.
Thanks for sharing these.
Babs.
Melyssa, do I need to create a new pin and delete the old? I’m trying to replace my pin image, but I can’t quite find it. If so, I would lose all the re-pins I have (I have less the 10, but they’re so precious to me) or keep both?
随便看看,随便转转!
感觉很不错的样子!
Thank you Melyssa! As a graphic artist and budding blogger, I can appreciate these tips 🙂
You’re so welcome! Thanks for the kind words and please keep me posted on all your progress 🙂
This is a great read! I really struggle with having a ‘brand’ of text/colors.. I like to experiment and really should lock it down on Pinterest. At least I have the vertical images and text steps down 😉
You learn something new every day! Best of luck, Stephanie! 🙂
I so appreciate this post! Just wondering, I just purchased the social warfare social share plugin, which gives you an option for both an image that will work on twitter, FB, and LI as well as an image for Pinterest. So I’m wondering if I still need to make the physical image that appears on my blog the Pinterest size?
Fantastic information!! When you really think about it, it is obvious but such good information to have collated in one place.
Yay! I’m so glad you enjoyed this post, Mikaela! Best of luck to you 🙂
Great info! What editing software, etc..do you suggest for making your pins? ie The 800×1200. I’m using Picmonkey, and usually love it, but find it difficult for some reason when trying to resize my Pinterest images.
Hey Tamara! Definitely check out http://canva.com. You can create some beautiful pins on there very easily. Good luck! 🙂
Great article – thank you for all of the information! When you suggest updating your Pinterest images following these guidelines how do you go about this? Is there a way to update a current pin with a new image or would I be creating the new pin, adding it to my blog post and pinning it to my blog board? Would you suggest deleting the old pins or keep both since the old ones may have re-pins. Thank you! 🙂
Hey Kim! You would be creating a new pin and adding it to your board. Unless the old pin is irrelevant or is damaging your brand image, you can keep both the old and new pin! Best of luck and please keep me posted on your progress 🙂
Just added link to this post to my Evernote “Worth Sharing” folder. Loved the inclusion and choice of Before & After images you included. Thanks!
Yay! I’m so glad you liked the post! Thanks for letting me know 🙂
I updated most of my images for pinterest but just need to go back and update some of my older posts too!
Great job, Jackie! Best of luck optimizing your older posts 😀
Girl, I always did my best to use images without a thing written on them. I like to keep it simple and pretty. But many of my clients find me on Pinterest, and after I got Tailwind, I realized my most pinned image (every week, no fail!) is the one that clearly states what the post is about (in big letters).
You’re my newest (only) Pinterest Goddess. ????
No nooo, I’m no Pinterest Goddess but thanks for the kind words haha! I’m a fan of beautiful images w/o text too but the text overlay on Pinterest is just so effective in letting readers know what you’re all about!
Best of luck to you, Kelly! 😀
#7 “Last but not least” is sooo right. This is the #1 reason I love Pinterest to begin with. A visual search engine is genius and all, but I looooveee that the value of a post doesn’t depreciate with time on Pinterest. In fact, I think as time goes on, those posts become even more valuable to Pinterest’s algorithms. Some of the most popular posts on that just keep coming up over and over when I search are actually quite old!
Good point! This is why it’s so important to create evergreen content for Pinterest. Good luck to you, Nia! 🙂
Your post is just stunning and your article is so great . This before + after is really important for online business , Thanks .
Thanks for the kind words, Antoinette! I’m glad you liked the post 🙂
NO WAY!!! I had absolutely no idea that Pinterest was more of a search engine rather than a social media platform. This changes things for how I now plan to use Pinterest. This information is very valuable Melyssa. Great work!
Yep, it sure is! Using Pinterest while keeping this in mind will definitely help you grow your traffic. Best of luck to you, Joshua 🙂
Thank you Melyssa. I just heard you did a webinar with Navid Moazzez and I can’t believe I missed it. I bet you shared some gems in that webinar. Any way I can find a recording of it somewhere? I would love to see it. Thanks.
Ah, I think that presentation replay has expired by now but if you check out http://listbuildingschool.com/ and ask them nicely, they might be able to get it to you 🙂
Random question! How do you do those cute freebies? Do you use Adobe to create the PDFs? I’m trying to start working on this aspect this week (hopefully). I would love the input.
Hey Nisan! I actually use both Photoshop and Adobe InDesign to create them. Good luck 🙂
Thanks! I am learning so much from you and your posts! 🙂
I see the image at the top as 640×906 rather than 800×1200 as mentioned in the article. What tool or plugin do you use that makes it the smaller when shown in the post, but that allows it to pin at full-size?
I use a plugin called Social Warfare to take care of that for me 🙂
Are you an affiliate? I’d like you to get credit when I buy the plugin!
I noticed that you have the vertical Pinterest-ready image at the top of your post, and it’s the image that gets chosen when I click the “Pin It” button in your group of social sharing buttons. But the image for this post that is displayed on your homepage is a cute square image of a laptop. Could you tell me, how do you manage to display different images on your homepage blog feed, that are not your Pinterest-images?
I’ve been trying to figure this out on my own blog for ages! I’d like to have horizontal images with post excerpts when scrolling through my blog homepage, and at the same time have the Pinterest-friendly feature images set for each post.
Hi Hannah! I use a plug-in called Social Warfare to help me do this 🙂
Thanks for sharing this!!!
Thank you Melyssa, I´m trying to improve my strategy using Pinterest and you blog is full of useful resources.
Although I heard about the issue between horizontal and vertical pictures, I wasn’t really applying this tip. Thanks!
Yay! I’m so glad this post was helpful for you, Alessia! Best of luck and please keep me posted on your progress 🙂
Thanks very much for these tips, Melyssa! I’m off to change the fonts on my images to make them more readable. Pretty does not equal better!
NK // diywptips.com
Woohoo! Best of luck to you! 🙂
I had no idea Pinterest can have such an impact! I also ready your article on how to improve my “About Me” section and I learned a lot. Well, I better create one soon! Thanks Melyssa!
-Bryan
bryncsio.weebly.com
Yay! I’m so glad those posts were helpful for you, Bryan! Best of luck and please keep me posted on your progress. 🙂
Thanks so much for this info! I’m off to go create some images and update all my old blog posts and pins. 🙂
Woohoo! Good luck, Katherine! 🙂
I am going to try your techniques that you describe on your article. I will try this for my personal Pinterest page if it works then I will apply on my business account. Thanks for the ideas. Hope I will succeed.
Best of luck to you, Abdullah! 😀
Thank you! This is awesome!
But could you do a post explaining how you create your blog post graphics (tools, fonts, images, design, etc)? That’s where I have difficulties!
Thanks
Hi Filipa! For tutorials like that I would definitely recommend watching YouTube videos or even taking a graphic design course because it’s such a visual process. Good luck! 😀
Super helpful thanks a bunch, will be implementing these tips for my new project for sure!!
Hey Melyssa,
I have a quick question about the sizing. Do I need to have my graphic at full size (800×1200) on my post or can I tweak it down a bit? I just feel like it looks HUGE on my blog post and makes the reader have to scroll a lot just to get to the text. Am I making sense?
Good question! I use a plug-in called Social Warfare to control which images show in my blog post but are still connected to a certain pinned image. Definitely give it a look. 🙂
Thanks so much Melyssa! I’ll check it out.
Hey, Melyssa! I use Blogger rather than WordPress and have a blog that is several years old with around 100 posts…I am slowly adding pinteres images – thank you! – and am wondering if I will need to move this blog to WordPress to be more successful. What are your thoughts?
Hey Molly! ‘m not very familiar with Blogger but I do know that most people who are serious about their blogs/online businesses and monetizing them use WordPress simply because of the ownership and the powerful capabilities and tools that come with it.
Feel free to message my team at hi@thenectarcollective.com and they can send some of my blog posts and resources your way. 🙂
I took notes from this post, i will continue to practice these tips from you, thank you 🙂
Great job, Prasanna! Keep up the good work. 🙂
Hi Melyssa! Great, concise and effective post as usual. I’m wondering if there’s a way I can have Pinterest images link back to the relevant blog posts without that image being IN the post. I noticed you advising ppl to use Social Warfare but I don’t have WordPress. Did you know of anything? I don’t want the Pinterest image to be my breaking image on the post and not too keen on it being huge at the end of my post. Thanks in advance!
Here’s a blog post that my friend, Brittany Berger, wrote up with a couple of ideas on how to make this work without Social Warfare: http://www.brittanyberger.com/hidden-pinterest-images-tutorial/
Good luck! 🙂
Thanks for the quick reply + being on top of your game girl 🙂
Thanks so much for sharing this! @disqus_8QSfPX9ddN:disqus , let me know if you need any help! 🙂
Thank you so much for these amazing information! 🙂 I love your blog, you are a big help! <3 Is it okay to create 3-4 images for 1 blog post? I always create only 1 image for each post but I'm curious what would happen if I would create more than 1. Since I'm using Pinterest I've got a lot of followers and repins which is amazing! But how can I get more page views? I always link my blog. 🙂
Thank you and please keep up your amaazing work! <3
Sure, you dan definitely create 3-4 images per blog post if you’d like. You can then see which one works best on Pinterest and remove the least popular one and try to test a new image. Good luck! 🙂
Thank you! 🙂
Thanks for including so many great before and after photos. It’s so helpful to have a visual to spark new ideas. And I love that you use a lot of blues and greens even though I’ve read that warm tones tend to be more popular (not sure if that is 100% correct). I love your color scheme.
Thank you for your feedback, Heather! 🙂 I think the important thing is to develop a theme that’s consistent across the board, and then others will begin to recognize your pins as they come through in their feed!
Hi Melyssa,
Have you ever used Visme to design?
I plan to use infographics, but would like to also have the ability to design professional looking images.
I am leaning towards it at the moment, but would like to know what software you prefer to use for create stunning images like above,
I have only recently become a member of your community but I am enjoying your energetic warm writing and I am look forward to enjoying the rest,
P.S your writing is very niche and engaging within this already busy niche of Digital Marketing…. I love it!
P.P.S I am new to blogging.
#heckyes
Dan
Hi Dan, thank you for your kind words 🙂 So thoughtful of you to say. I have not personally used Visme, and haven’t heard of it, actually! I use Photoshop for most of my graphics, but Canva is another amazing tool if you’re a design newbie. It has much less of a learning curve, it’s free, and there are lots of templates to choose from that are already pre-formatted for all of your basic design needs (blog post images, social media sized graphics, etc.) Good luck with your blog!
Thanks for the advise, yes i have used Canva it is a good design tool which i like, but i am looking for a more professional software and have never used Photoshop, so thanks again i will research into it.
Hi Melyssa,
I just discovered your blog from my fiancee and I love it! You are so awesome!
I wrote a book about how to treat musculoskeletal pain all by yourself, and now i am going back to break down the book for blog posts. I am a chiropractor who started practice inside of a CrossFit gym. Lots of soft tissue injuries! LoL
But my question is about the post images. Do you make them with photoshop, Ilustrator, both, or something else? The reason I ask is because photoshop text always shows up poorly. I am guessing this is something you go into depth on in your course, but I wanted someone to clear this up: Could I find a photo, apply an overlay, then export to illustrator to add on text? Thanks!!! You’re too cool!
Thank you so much! 🙂 I create all of my images using Photoshop, but Canva is a great option if you’re just getting started.
Another beaut, Melyssa. It has taken me 9 months to practice and hone my blog “look” — and so I totally understand what you mean about limiting the experimentation. I was going crazy there for a while haha! Thanks so much.
Yay! I’m so glad this was helpful for you, Meghan. Wishing you the best of luck and please keep me posted on your progress. 🙂
Hi Melyssa, I love how you share your own experiences and give awesome tips like the ones in this post.
I have launched my blog two weeks ago and so far is going well but these tips allow me to understand more about the blogging world and to improve Melted. Thank so much and I will keep on reading 🙂
So excited to hear this, Natacha! 🙂 Congratulations on launching your blog!